WP Enthusiast WP Professional WP Professional Plus PairSIM WordPress Podcast Websites
Adding Web Safe Fonts
If you're planning on using a web-safe font that is automatically recognized, you can just go to the Customizing Additional CSS interface and add the font as you would to a regular CSS file. CSS in this interface will overwrite the default CSS.
See how to find the Customizing Additional CSS interface in our article, How to Change WordPress CSS.
Add Google Fonts with a WordPress Plugin
There are plugins that will give you access to new fonts for your site. Many of these plugins don’t require any CSS experience, so this is an easy way to incorporate new fonts.
Manually Add Google Font to Your WordPress Site
Unless you're using a plugin or one of the included web safe fonts, you will probably have to access the site's files to add new fonts. This is a good bit trickier than using plugins.
Steps Before You Make Changes
- Save a copy of your current theme's files. This way, if your changes accidentally break your website, you can reset it.
- Create a child theme
Choose a Google Font
- Go to Google Fonts and pick out a font (or two)
- Add fonts by clicking the plus button in the right corner of the font box
- Click the black bar at the bottom of the screen when you are finished - this is your font “cart”

- Under Embed Font, click Standard
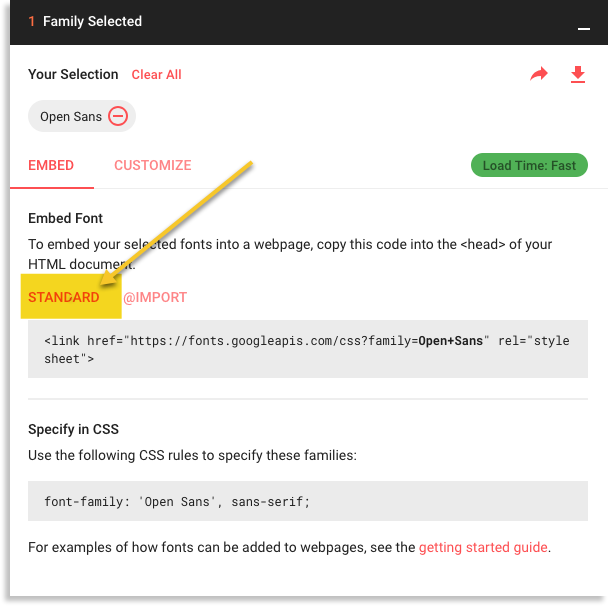
- Under Standard, copy the text
- Keep this page open. You will be returning to it. Open a new tab and navigate to your WordPress Admin interface.
Add the Font to WordPress Site
- Log in to your WordPress account through the ACC. For instructions on how to do this, check out our How to Log In to WordPress article
- Once you’re in your WordPress admin editor, go to the left sidebar
- Hover over Appearance, then click Editor in the drop-down
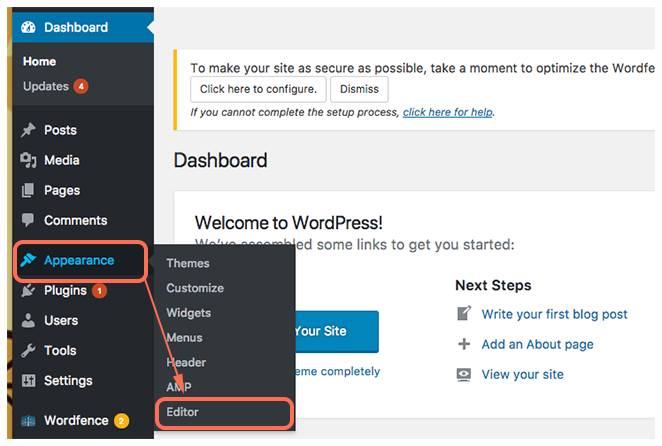
- Go to your functions.php file. It will be listed in the right sidebar
- Add the following code to the bottom of the file:
function add_custom_google_fonts() { wp_enqueue_style( 'custom-google-fonts', '<link href="https://fonts.googleapis.com/css?family=Open+Sans" rel="stylesheet">', false ); } add_action( 'wp_enqueue_scripts', 'add_custom_google_fonts' ); - Click the Update File button
Replace the highlighted link with the font link you received in the previous section. This will add the font(s) to your site.
Use the Google Font
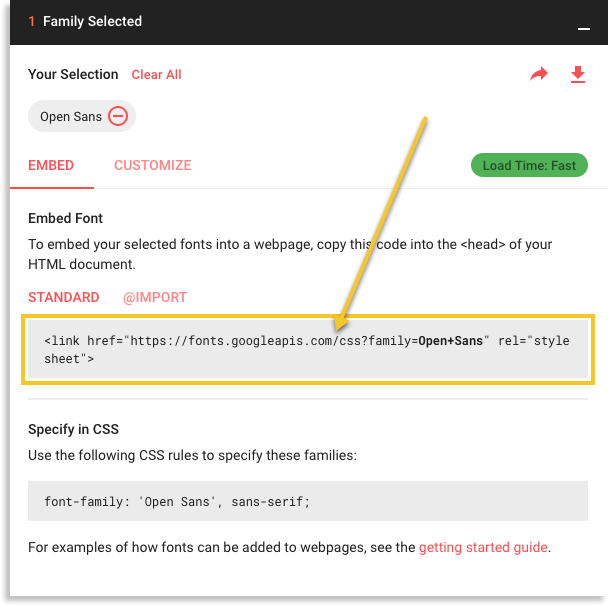
- Go back to your Google Fonts page and open the cart
- Under the Specify in CSS section, copy the text
- Go to your Customizing Additional CSS interface and paste the text into the text field. To find this interface, see our How to Change WordPress CSS article
- Enclose the text in curly braces and specify what elements you want the font to be applied to. It will resemble the code below:
h1, h2, p {font-family: 'Open Sans', sans-serif }; - Click Publish
If done correctly, your site should now reflect the font change.
Add a Font via a Font File
- Upload the font file to your server
- If you’re using a font file, it most likely has a CSS file with the @font-face rule filled out. Find this file and copy the @font-face rule and everything encased in its braces.
- Paste this into the text field in the Customizing Additional CSS interface. To find this interface, see our How to Change WordPress CSS article
- Check the path files. If the file paths changed when the files were added to the server, this will need to be reflected in the code
For example, your code will look something like this after you add the file’s path:
@font-face {

font-family: ‘arialregular’;
Src: url(‘folder/arial-Regular-Webfont.eot’);
Src: url(‘folder/arial-Regular-Webfont.eot?#iefix’) format (‘embedded-opentype’),
url(‘folder/arial-Regular-Webfont.woff2’) format(‘woff2’),
url(‘folder/arial-Regular-Webfont.woff’) format(‘woff’),
url(‘folder/arial-Regular-Webfont.ttf’) format(‘truetype’),
url(‘folder/arial-Regular-Webfont.svg#arial-regular’) format(‘svg’);
Font-weight: normal;
font-style : normal;
}
Now we have to style our preferred text. Do this by writing out the elements you want to be affected (headers, paragraphs, etc.) below the @font-face rule
After the list, add brackets and put the font-family element and your new font’s name inside
h1, h2, h3, h4, p { font-family: ‘arialregular’, serif; }
All you have to do now is click Publish and the new font should be reflected on the site.