Shared VPS Dedicated WP Professional Plus
Email forwarding can be used when out of the office or when setting up a catch-all email address. This article shows you how to configure your mailbox to forward all emails to another address.
Mailboxes and Forwarding
Mailbox forwarding in the Account Control Center (ACC) is set up by using recipes, which you can learn more about in our Email Recipes article.
There are two types of recipes that can be used to set up email forwarding: mailbox and forwarding.
Both options will get the job done, but it's important to know the difference if you want the most efficient setup.
We've outlined the differences below.
Mailbox
A mailbox recipe is used to send emails from one Account Control Center (ACC) mailbox to another. This is faster than forwarding since it is traveling within the ACC system.
A mailbox recipe should not be used for forwarding to email accounts outside of the ACC.
Forwarding
Forwarding recipes are used to forward emails from an Account Control Center (ACC) mailbox to an email address outside of the ACC.
A forwarding recipes should not be used to forward mail between two ACC mailboxes. It is much more efficient to use the mailbox recipe to forward mail between two ACC mailboxes.
Setting up a Mailbox Recipe
This recipe automatically delivers an email message to a specified mailbox on your account. When used by two Pair email addresses, this is faster than forwarding.
Choose the tutorial that reflects your ACC interface type:
Not sure what the difference is? See Which ACC Interface Am I Using?
If you are using the Legacy Interface:
- In the left sidebar, click E-Mail
- In the drop-down, click Create New Recipe
- Choose whether you want emails rerouted from A single e-mail address or All e-mail addresses for this domain name
- If you select A single e-mail address, input the email address and select the domain
- If you select All e-mail addresses for this domain, select the domain name from the corresponding drop-down menu.
- Under the Recipe Type header, select Mailbox
- Click Proceed
- On the next page, confirm you have selected the correct Recipient e-mail Address and Recipe Type
- Next to Deliver To, click the drop-down and select the mailbox where you want the emails delivered
- Click Create Mailbox Delivery
If you are using the New ACC Interface:
- In the top navigation bar, click Email
- Click the New Recipe button
- In the “Recipient Address” section, select between:
| A single email address | This will apply the recipe to a single email address. Use the text field and drop-down to input your chosen email address. |
| All email addresses for domain | This will apply the recipe to all email addresses on a domain name. Use the drop-down to select a domain. If you select this option for a Forward or Mailbox recipe, this will reroute all email addresses to another mailbox. |
- In the “Recipe Type” section, select Mailbox
- Click the Proceed button
- Confirm the details are correct
- In the Deliver To drop-down, select the mailbox where you want the emails to be delivered
- Click the Create Mailbox Delivery button
The recipe may take up to 10 minutes to become active
Setting up a Forwarding Recipe
This recipe automatically forwards incoming mail to the destination address specified.
Choose the tutorial that reflects your ACC interface type:
Not sure what the difference is? See Which ACC Interface Am I Using?
If you are using the Legacy Interface:
- In the left sidebar, click E-Mail
- In the drop-down, click Create New Recipe
- Select A single e-mail address and type in the email’s address and select the domain
The All e-mail addresses for this domain name option does not work with forwarding emails. - Under Recipe Type, select Forward
- Click the Proceed button at the bottom of the page
- On the next page, confirm you have selected the correct Recipient E-mail Address and Recipe Type
- Next to Forward To, input the email where you want your domain emails forwarded
- If you want a our Junk Filter applied to the forwarded emails, click the box next to Junk E-mail Filtering
- Click Create Forward
This may take up to 10 minutes to become active
If you are using the New ACC Interface:
- In the top navigation bar, click Email
- Click the New Recipe button
- In the “Recipient Address” section, select between:
| A single email address | This will apply the recipe to a single email address. Use the text field and drop-down to input your chosen email address. |
| All email addresses for domain | This will apply the recipe to all email addresses on a domain name. Use the drop-down to select a domain. If you select this option for a Forward or Mailbox recipe, this will reroute all email addresses to another mailbox. |
- In the “Recipe Type” section, select Forward
- Click the Proceed button
- Confirm the details are correct
- In the Forward To drop-down, select the mailbox where you want the emails to be forwarded
- If you want a our Junk Filter applied to the forwarded emails, toggle on the Enable filtering for this recipe option
- Click the Create Forward button
The recipe may take up to 10 minutes to become active.
Setting Up Forwarding in Webmail
If you want to set up email forwarding in your webmail client, you can do so by applying filters.
- Log into your RoundCube email
- Go to Settings

- Click Filters

- Under Filters, click the + button

- Input “Forwarding” into the Filter name box
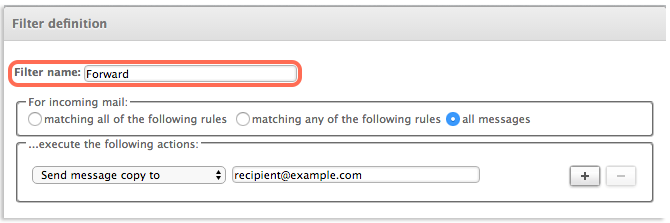
- Under For Incoming Mail, select all messages

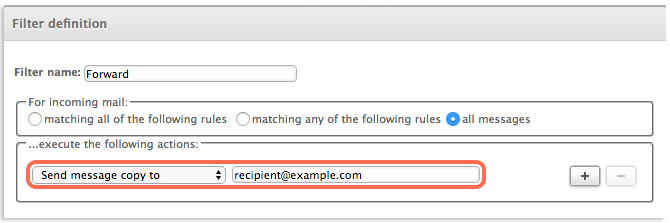
- Under ...execute the following actions, select Send message copy to from the drop-down
- In the box next to it, input the email address you want to receive the forwarded mail
- Click Save