
Thunderbird was created by Mozilla in 2004. It is a free, open-source email client that can be downloaded at Thunderbird.net.
If you need help finding your username and other configuration settings, see our article, Setting Up an Email Reader.
Setting up your Email for Thunderbird on macOS
Go to the tutorial that matches your Thunderbird version:
Thunderbird Version 148.0
The process differs depending on whether you’re an established Thunderbird user or you’re setting up Thunderbird for the first time on this device. See instructions for each scenario below:
First Time Thunderbird Setup
Setting up Thunderbird for the first time? Follow these steps to get started.
- Open the Thunderbird application on macOS
- Fill in the fields:
| Your full name | Enter the name you want to appear in the From field when you send messages. Example: Jane Smith |
| Email Address | Enter your complete email address. Example: [email protected] |
| Password | Enter the password for your email account. |
- Click Configure manually

- Fill in the Incoming and Outgoing Server settings:
| Incoming Server | |
| Protocol | Choose IMAP or POP. See IMAP vs POP: Which Should You Use? |
| Hostname | Enter your outgoing mail server. This is usually one of the following formats: - username.mail.pairserver.com - mailX.pair.com To find your exact server name, see Finding Your Incoming and Outgoing Servers. |
| Port | Enter the port number for your account type. Common defaults are IMAP: 993 (SSL/TLS) or POP: 995 (SSL/TLS). Example: 993, 995 |
| Connection Security | Select the encryption type used to secure your connection. Common options include SSL/TLS or STARTTLS. |
| Authentication Method | Select the method your mail client uses to authenticate. |
| Username | Enter your full email address. |
| Outgoing Server | |
| Hostname | Enter your outgoing mail server. This is usually one of the following formats: - username.mail.pairserver.com - mailX.pair.com To find your exact server name, see Finding Your Incoming and Outgoing Servers. |
| Port | Enter the port number for your account type. A common default is 587 (STARTTLS). Example: 587 |
| Connection Security | Select the encryption type used to secure your connection. Common options include SSL/TLS or STARTTLS. |
| Authentication Method | Select the method your mail client uses to authenticate. |
| Username | Enter your full email address. |

- Click Done.
If the Done button is unavailable, click Re-test to verify your settings. Once the test completes successfully, Done becomes available. - Click Finish
Adding an Additional Email to Thunderbird (via Account Hub)
- Open the Thunderbird application on macOS
- Click the menu button (☰) in the upper right corner
- Click New Account
- Click Email
- Enter the following information:
| Full Name | Enter the name you want to appear in the From field when you send messages. Example: Jane Smith |
| Email Address | Enter your complete email address. Example: [email protected] |

- Click Continue
- Click Edit Configuration

- Fill in the Incoming Server Settings:
| Protocol | Choose IMAP or POP. See IMAP vs POP: Which Should You Use? |
| Hostname | Enter your outgoing mail server. This is usually one of the following formats: - username.mail.pairserver.com - mailX.pair.com To find your exact server name, see Finding Your Incoming and Outgoing Servers. |
| Port | Enter the port number for your account type. Common defaults are IMAP: 993 (SSL/TLS) or POP: 995 (SSL/TLS). Example: 993, 995 |
| Connection Security | Select the encryption type used to secure your connection. Common options include SSL/TLS or STARTTLS. |
| Authentication Method | Select the method your mail client uses to authenticate. |
| Username | Enter your full email address. |

- Click Continue
- Fill in the Outgoing Server Settings:
| Protocol | The protocol used for sending mail. Thunderbird uses SMTP for all outgoing mail. |
| Hostname | Enter your outgoing mail server. This is usually one of the following formats: - username.mail.pairserver.com - mailX.pair.com To find your exact server name, see Finding Your Incoming and Outgoing Servers. |
| Port | Enter the port number for your account type. A common default is 587 (STARTTLS). Example: 587 |
| Connection Security | Select the encryption type used to secure your connection. Common options include SSL/TLS or STARTTLS. |
| Authentication | Select the method your mail client uses to authenticate. |
| Username | Enter your full email address. |

- Click Test
- Click Continue
- Enter the password for your email account
- Click Continue
- Click Finish
Turning Off the Account Hub Feature
If you run into errors or an infinite loading bug when adding additional accounts through the Account Hub feature, you can temporarily disable Account Hub by following these steps:
- Open the Thunderbird application
- Click the menu button (☰) in the upper right corner
- Click Settings
- In the Account Hub section, uncheck Create accounts in the new Account Hub
After disabling this option, follow the steps in the First Time Thunderbird Setup tutorial above to add additional email addresses to Thunderbird.
Thunderbird Version 91.0 - 140.8.0esr
- Open the Thunderbird application
- In the left sidebar, click Local Folders
If you have not yet set up Thunderbird with any email account, there will be no sidebar. In this case, proceed to step 3. - Click Email

- A pop-up will appear. On this pop-up, enter the following information:
- Your Name: This name will display on the email address
- Email Address: The email address you want to add to the email client
- Password: The password for the email address. Note that this is not the password for your hosting account.
- Underneath the fields, click Configure Manually

- Fill out the fields:
- Hostname: Enter your incoming/outgoing servers. For more information about how to find your mail servers, see our article: How to Find Your Email’s Incoming and Outgoing Servers
- Port: Enter your port number. This field will vary based on whether you chose IMAP or POP. You can find common port numbers in our IMAP vs POP article.
- Connection security: In most cases, you can leave this on Autodetect.
- Authentication method: In most cases, you can leave this on Autodetect.
- Username: Re-enter your email address.

- Click Done
If the Done button is grayed out, click the Re-test button to verify that the information above is correct. If it is, this will make the Done button clickable. If it stays grayed out, double-check the information you just entered for errors. - Click Finish
If all the information is correct, your email address will be added to the Thunderbird email client.
Thunderbird Version 78.0
- Go to Applications in Finder and open the Thunderbird application
- In the left sidebar, click Local Folders
If you have not yet set up Thunderbird with any email account, there will be no sidebar. In this case, proceed to step 3. - Click Email
- A pop-up will appear. On this pop-up, enter the following information, then click Continue:
| Your Name | The name that will display on the email address |
| Email Address | The email address you want to add to the email client |
| Password | The password for the email address. Note that this is not the password for your hosting account. |
- Select IMAP or POP. For more information about the difference between IMAP or POP, see our IMAP vs POP article.
- Next, click Configure Manually
- In the fields next to Server, enter the incoming and outgoing servers.
For more information about how to find your mail servers, see our article: How to Find Your Email’s Incoming and Outgoing Servers - In the field next to SSL, select SSL/TLS
- In the two fields next to Username, enter your ACC username
- Click Done
If the Done button is grayed out, click the Re-test button to verify that the information above is correct. If it is, this will make the Done button clickable. If it stays grayed out, double-check the information you just entered for errors.
If all the information is correct, your email address will be added to the Thunderbird email client.
Thunderbird Version 60.0
- Go to Applications in Finder and open the Thunderbird application
- In the left sidebar, click Local Folders
- Under the Accounts section, click Email
- A pop-up will appear. On this pop-up, enter the following information:
| Your Name | The name that will display on the email address |
| Email Address | The email address you want to add to the email client |
| Password | The password for the email address. Note that this is not the password for your hosting account. |
- Select IMAP or POP.
For more information about the difference between IMAP or POP, see our IMAP vs POP article. - Click Manual config
- Under the Server hostname, enter the incoming and outgoing servers.
For more information about how to find your mail servers, see our article: How to Find Your Email’s Incoming and Outgoing Servers - Under SSL, select SSL/TLS
- In the text field next to Username Incoming and Outgoing, enter your ACC username
- Click Done
If all the information is correct, your email address will be added to the Thunderbird email client.
Thunderbird Version 52.0
- Go to Applications in Finder and open the Thunderbird application
- In the left sidebar, click Local Folders
- Under the Accounts section, click Email
- Click Skip this and use my existing email
- On the next page, enter your display name, email address, and email address password, then click Continue
- Choose between IMAP or POP.
For more information see our IMAP or POP: Which One Should You Use? article - Click Manual Config
- Replace the Incoming and Outgoing Server hostnames with your mail server.
For help finding your mail servers, see our How to Find Your Email's Incoming and Outgoing Servers article - Replace the Username with your account username
- Under SSL, select SSL/TLS for both incoming and outgoing
- Click Done to finish
- Go to Applications in Finder, and open up the Thunderbird application
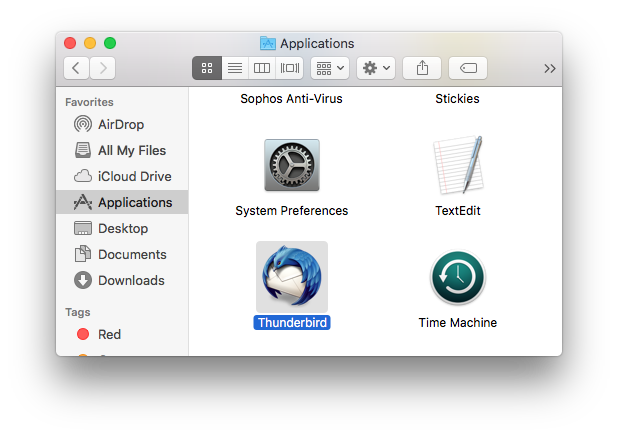
- Under Create a new account: click Email

- Click Skip this and use my existing email
- Add your name, email address, and password and click Continue
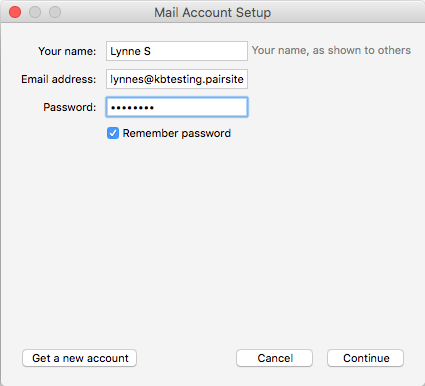
- Choose between IMAP or POP. For more information see our IMAP or POP: Which One Should You Use? article
- The application will automatically scan for incoming and outgoing email servers and display them and your username below. If these details are correct, skip to Step 11.
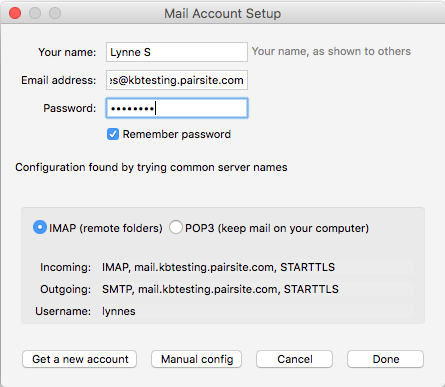
- If these details are incorrect, click Manual Config, then click Advanced Config to change them
- Next to Server Name, input the email's server name
- Next to User Name, input your username followed by its full domain name
- Example: [email protected]
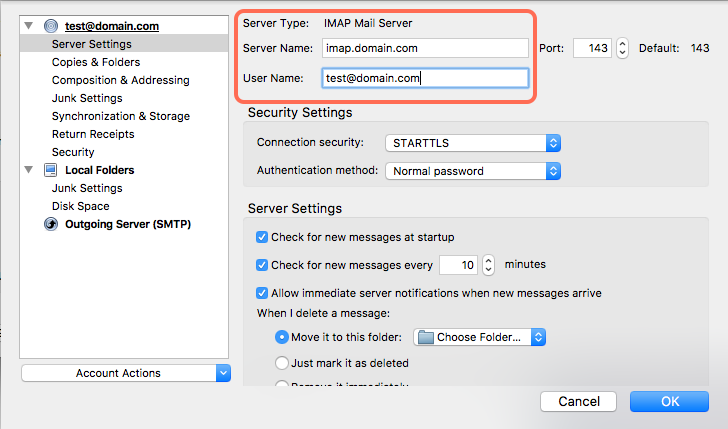
- Example: [email protected]
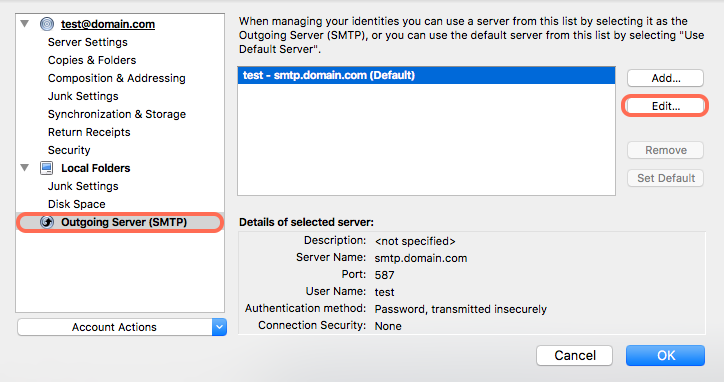
- Under Outgoing Server (SMTP) choose your email from the list and click Edit
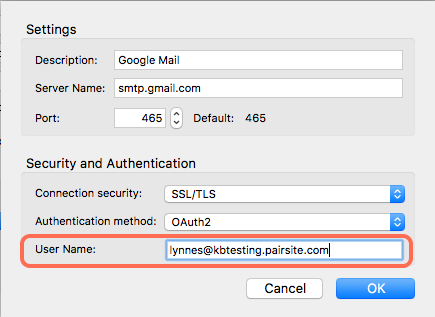
- In the User Name field, type your username followed by its full domain name
- Example: [email protected]

Note: Make sure the Server Name matches the server name you entered earlier
- Example: [email protected]
- Click OK to finish
Using SSL to Secure Your Email
Pair Networks provides support for SSL/TLS and STARTTLS encryption for all IMAP, POP, and authenticated SMTP connections. Using encryption is an important way to prevent your password from being stolen.
POPS/IMAPS only secures the connection between your email reader and the mail server. Once it reaches the mail server, it will be in plain text. For additional security, you would need to encrypt the email message itself. The port for POPS is 995, the port for the IMAPS is 993, and the ports for encrypted authenticated SMTPAUTH are 465 and 587. These are the standard ports for these services, and you should not need to manually set them.
Please note that we replaced the secure certificate used to provide POPS, IMAPS, and SMTPS email services (sending and receiving email over SSL). Our SSL certificate vendor has changed to a new "root" certificate, which is recognized by most, but not all, email programs. If your email program begins returning errors and indicates that the server certificate is not recognized, please download the root certificate below and install it in your email program. The specifics of how to install a certificate will vary from program to program -- please consult the help files of your program for details.
Please also note that our mail servers use an SSL certificate. If you use this SSL option in conjunction with a domain name, your email reader may warn you that the domain names do not match. Some email readers will allow you to ignore this warning. In these cases, your incoming email will remain secure.
However, some email readers will not let you proceed if the security certificates do not match. If this occurs, please verify your incoming server settings as follows:
For accounts created prior to June 1, 2011:
mailX.pair.com
(where X is your server number)
For accounts created on or after June 1, 2011:
username.mail.pairserver.com
(where "username" is your main account username)