1. Home
  2. Email
  3. Setting Up an Out-of-Office/Vacation Message

Setting Up an Out-of-Office/Vacation Message

Shared

VPS

Dedicated

WP Professional Plus

Note that you must log in to your hosting account for this tutorial, not your email account.

For information about setting up an out-of-office response from your email account, see your email client's documentation.

Follow the steps below to set-up an automated response for when you are out of the office or on vacation.

Setting Up an Out-of-Office/Vacation Message with a Pair Mailbox 

Choose the tutorial that reflects your ACC interface type: 

  • Legacy Interface
  • New ACC Interface

Not sure what the difference is? See Which ACC Interface Am I Using? 

If you are using the Legacy Interface:

  1. Log into your web hosting account at my.pair.com

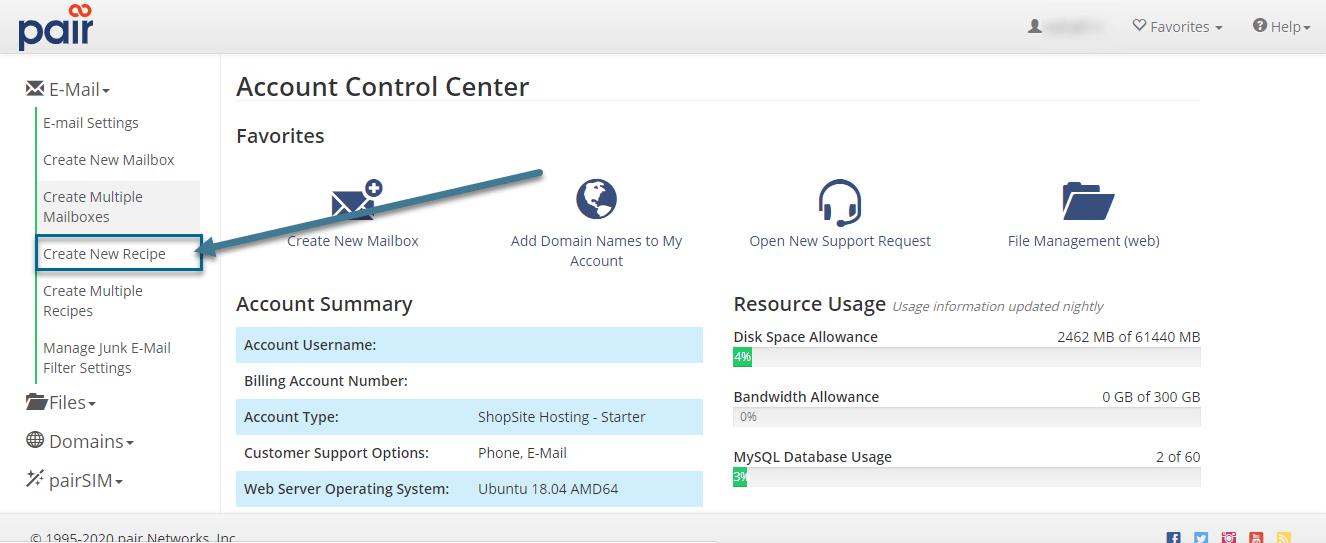
    Note that you must log in to your hosting account for this tutorial, not your email account.For information about setting up an out-of-office response from your email account, see your email client's documentation. 
  2. In the left sidebar, click E-Mail
  3. In the drop-down, click New Recipe button image
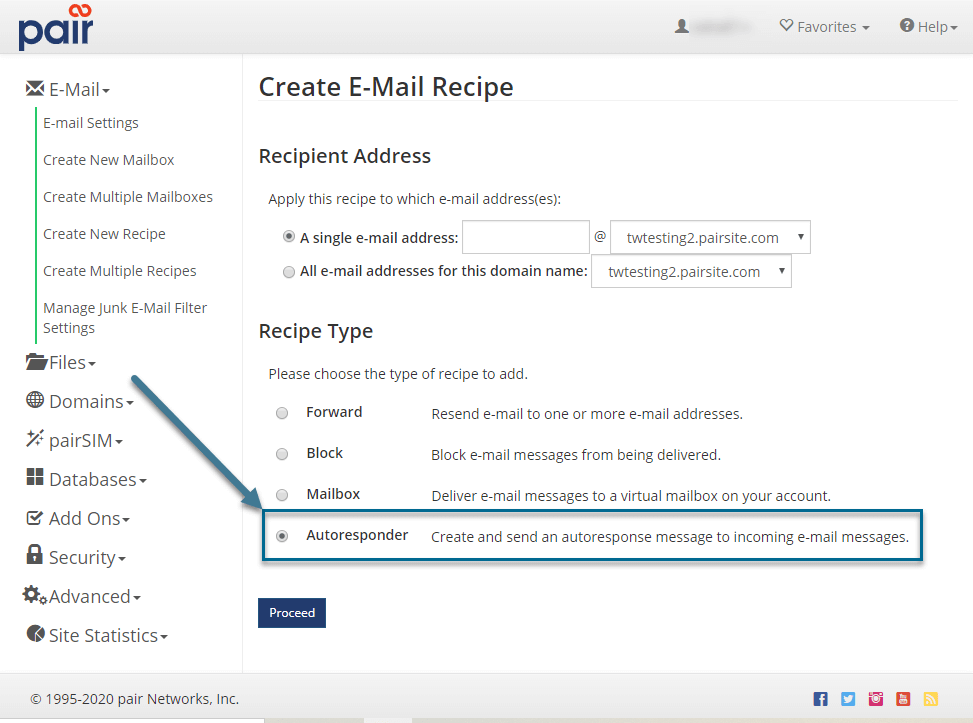
  4. Choose whether you want an auto-response message for A single e-mail address or All e-mail addresses for this domain name
If you select a single e-mail address,

If you select A single e-mail address, input the beginning of the email address and then select its domain from the corresponding drop down

If you select all e-mail addresses for this domain

If you select All e-mail addresses for this domain, select the domain name from the corresponding drop-down menu

This will cause ALL emails addresses within this domain to send auto-response messages.

choose single or all image
  • Under the Recipe Type section, select Autoresponderautoresponder image
  • Click the Proceed button
  • On the next page, confirm you have selected the correct Recipient E-mail Address and Recipe Type
  • Fill in the following fields:
    Name

    This will be displayed as the sender of the auto-response email.

    From E-Mail Address

    This will be displayed as the sending email address. Replies to the auto-response email will be delivered to this address.

    Subject

    This will be displayed as the Subject header of the auto-response email.

    Autoresponder Message

    This will be the body of the auto-response emails.

    You may want to include the dates of your absence in the auto-response message.

  • Limit Autoresponse Frequency

    Use this option to limit how often each sender may receive your auto-response message. This MUST be checked if you want to use the Only Respond Every feature.

    Only Respond Every

    Here you can input how often the auto-response will be sent out.
    For example, if the auto-response is set only to respond every 1 day and johndoe@example.com sends you three emails in one day, he will only receive one auto-response message from you.

    You may want to limit frequency in case someone sends you multiple emails in a day.

  • Check the Date Range boxdate range image
  • Click the empty field next to Start Date. Use the calendar drop down to schedule a start date for the auto-response to go into effectset date image
  • Click the empty field next to End Date
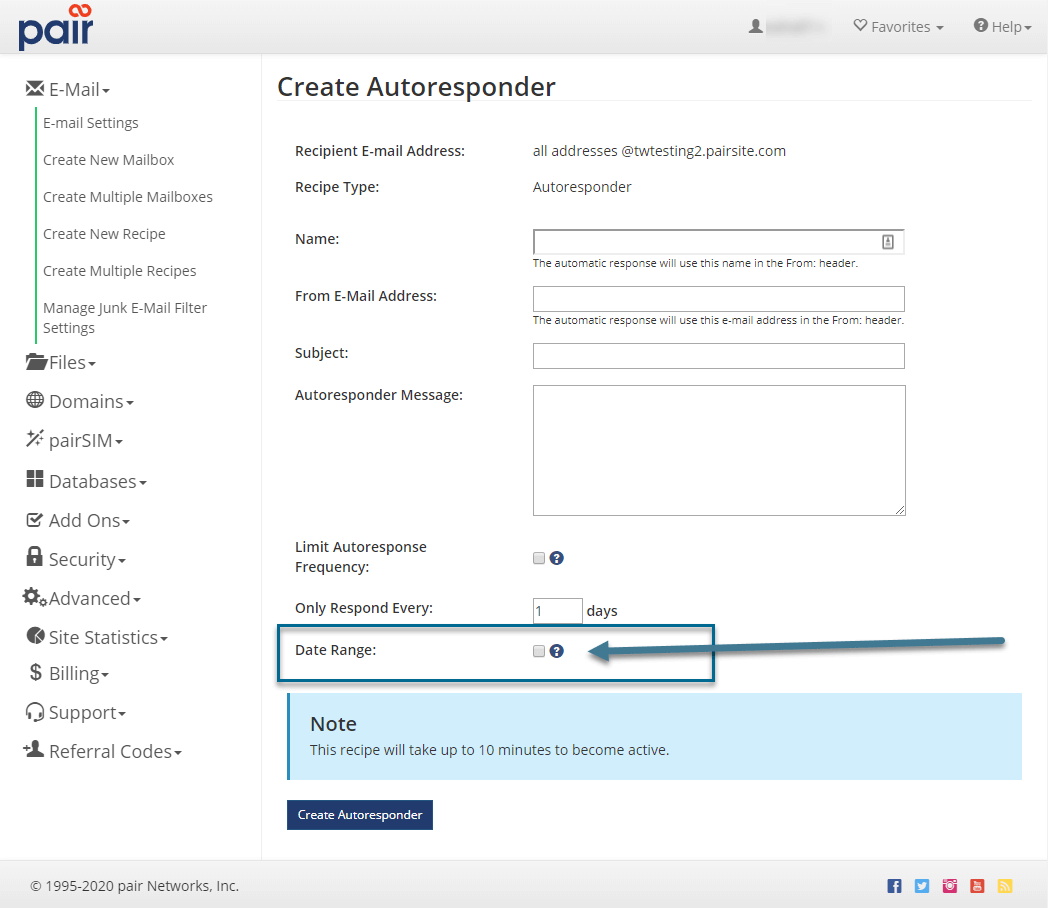
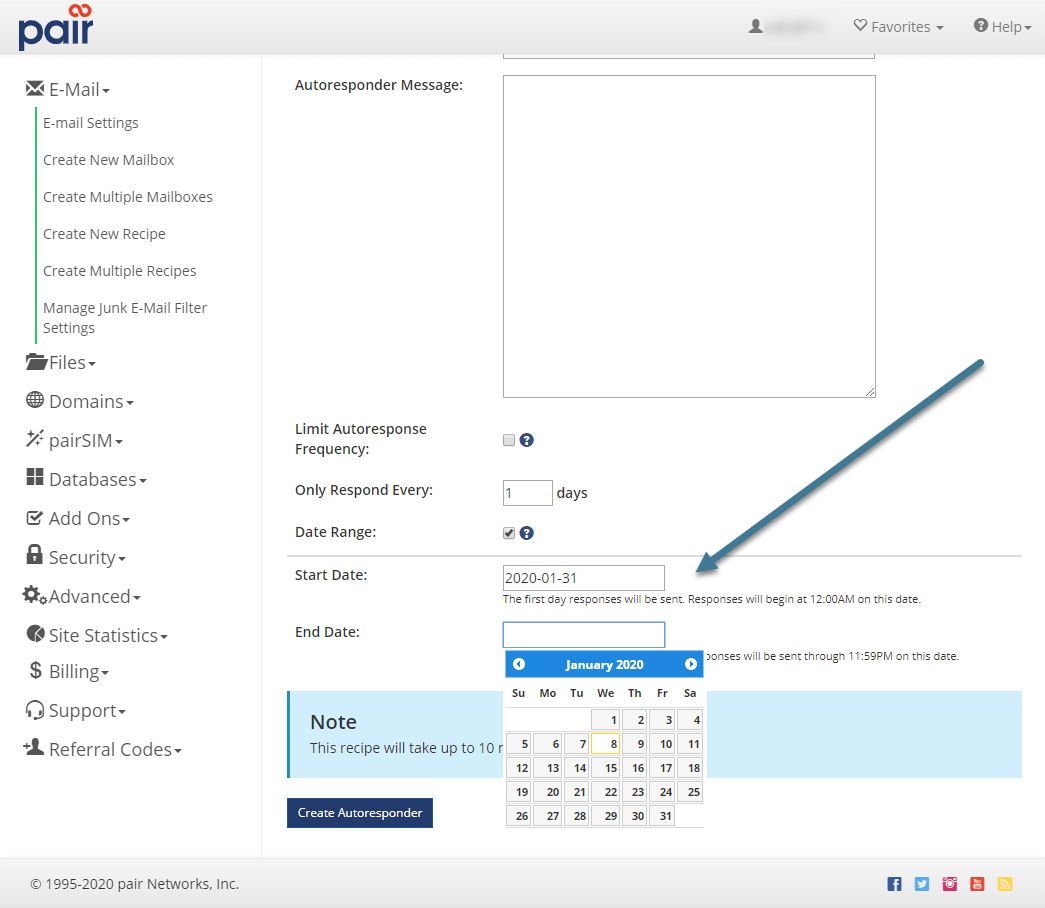
    Use the calendar drop down to schedule an end date for auto-response to stop
  • If you don’t set an end date, the auto-response will be in effect until you delete the recipe.

  • When you are finished filling in the fields, click Create Autoresponder to create your auto-response message.
  • Note: Responses will begin at 12 AM on the selected date.

    Congratulations! Your out-of-office/vacation message auto-response is now set-up. It will take effect at 12 AM of the start date you selected.

    If you do not select an end date for your auto-response, the auto-response will continue until you remove it. See Deleting a Email Recipe.

    If you are using the New ACC Interface:

    1. Log into your web hosting account at my.pair.com
    2. In the top navigation bar, click Email
    3. Click the New Recipe button
    4. In the “Recipient Address” section, select between: 
    A single email addressThis will apply the recipe to a single email address. Use the text field and drop-down to input your chosen email address. 
    All email addresses for domainThis will apply the recipe to all email addresses on a domain name. Use the drop-down to select a domain. 
    If you select this option for an Autoresponder recipe, this will reroute all email addresses to another mailbox. 
    1. In the “Recipe Type” section, select Autoresponder
    2. Click the Proceed button
    3. Fill in the following fields:
    NameThe automatic response will use this name in the From: header.
    From E-Mail AddressThe automatic response will use this email address in the From: header.Replies to the autoresponse email will be delivered to this address.
    SubjectThe autoresponse will use this as the Subject: header of the email.
    Autoresponder MessageThe autoresponse message will use this as the body of the email. 
    Limit Autoresponse FrequencyUse this option to limit how often each sender will receive your autoresponse message. This MUST be checked if you want to use the Only Respond Every feature.
    Only Respond EveryNote: The Only Respond Every option is only available if the Limit Autoresponse Frequency option is toggled on. 
    Use this field to limit the amount of autoresponses a sender may receive in a given time frame. 
    For example, if the autoresponse is set only to respond every 1 day and [email protected] sends you three emails in one day, they will only receive one autoresponse message.
    Date RangeToggle this option on if you want the autoresponse in place for a certain time frame. 
    If toggled on, set the:Start Date: Enter the date you want the autoresponse to take effect. Responses will begin at 12:00AM on this date.End Date: Enter the date you want the autoresponse to end. Responses will be sent through 11:59PM on this date.You can either write the dates in using the mm/dd/yyyy format or you can use the calendar to select the dates. 
    1. Click the Create Autoresponder button to create your autoresponse message.

    Congratulations! Your out-of-office/vacation message autoresponse is now set-up. 

    If you do not select an end date for your auto-response, the auto-response will continue until you remove it. See Deleting a Email Recipe.

    Updated on June 3, 2025

    Was this article helpful?

    Related Articles

    Need Support?
    Can't find the answer you're looking for?
    Contact Support