Creating and managing MySQL tables is a fundamental part of database development, and phpMyAdmin makes the process much easier through its user-friendly interface. Whether you're working on your first table or adding additional ones later, phpMyAdmin provides straightforward tools to help you structure your database efficiently.
In this guide, we'll walk you through how to create a table in phpMyAdmin and provide tips for managing it.
What is phpMyAdmin?
phpMyAdmin is a free, open-source web application used to manage MySQL or MariaDB databases via a browser. It simplifies database management tasks like creating tables, running SQL queries, and importing/exporting data.
If you're new to phpMyAdmin, start by logging into the interface through your hosting control panel. For Pair Networks customers, follow our guide on accessing phpMyAdmin in the ACC.
How to Add a Table in phpMyAdmin for the First Time
If you have not yet created a table for your database, the Create Table interface will automatically appear in the phpMyAdmin interface.
- Log in to the phpMyAdmin interface
- In the right side of the interface, enter the name of your first table and select the number of columns it should have
- Click Go
- Fill in the column information for your table:
- Name: The name of the column (e.g., id, name, email).
- Type: The data type (e.g., INT, VARCHAR, TEXT, DATE).
- Length/Values: Size of the field (e.g., 255 for VARCHAR).
- Default: Optional default value.
- Collation, Attributes, Index, Auto Increment, etc., as needed.
To add or remove columns from your table:If you added too many columns, you can simply leave them blank and they will be excluded from your table.
If you did not include enough columns, you can add more by going to the top of the interface, select the table name and add as many columns as you need. Be sure to click Go when finished.
- Click Save
Your new table will appear in the left sidebar underneath your database name.
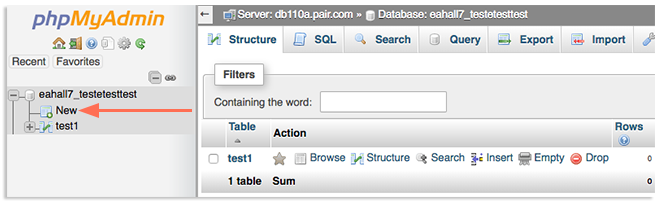
Adding More Tables in phpMyAdmin
Once your first table has been created, the method for adding tables to your database changes slightly. To create a new table after the initial table has been created, follow the instructions below:
- Log in to the phpMyAdmin interface
- In the left sidebar, find your database name and click New underneath it
- Fill in the column information for your table (Name, Type, Default, etc.)
To add or remove columns from your table:If you added too many columns, you can simply leave them blank and they will be excluded from your table.
If you did not include enough columns, you can add more by going to the top of the interface, select the table name and add as many columns as you need. Be sure to click Go when finished.
- Click Save
Your new table will appear in the left sidebar underneath your database name.
Creating tables in phpMyAdmin is a fast and flexible way to manage your MySQL database structure. With its easy-to-use interface, you can define columns, set data types, and modify your table design as needed. Once your database is organized, make sure you perform a site backup to save your database.