Shared VPS Dedicated WP Enthusiast WP Professional WP Professional Plus
So you bought an SSL certificate to secure your site. Now what?
Now that you have an SSL certificate, you have access to the secure HTTPS version of your site. The extra ‘s’ at the end of HTTPS means that the site is secured by an SSL certificate. However, the non-secure HTTP version of your site is still available for visitors to land on. Your next step after adding an SSL certificate to your domain is to decide what happens to the visitors who try to visit the non-secure version of your site.
You are given three options: block all traffic, reroute traffic to the secure version of the site, or allow visitors to access the non-secure version of the site.
| Redirect to https://domain.com | All traffic to the HTTP version of the site will be redirected to the HTTPS version of the site |
| Block access to the http:// site | All traffic will be blocked from visiting the HTTP version of the site. They will receive an error if they try. |
| Display the site normally | All traffic will be able to view the HTTP version of the site |
How you make this change can vary depending on your hosting type. So you need to first identify which section best describes your hosting package:
Once you have done this, navigate to that section and read about the next steps you should be taking.
Non-WordPress Hosting
After you have added an SSL certificate, it will automatically be installed on your domain. There are two steps to take after this automatic installation has taken place:
Changing the Non-SSL Site Display Options for Non-WordPress Hosting
- Log in to the ACC
- Click Domains in the left sidebar
- Click Manage Your Domain Names in the drop-down
- Click the name of the domain whose display options you want to change
- Find the Change Non-SSL Site Display Option button and click it
- Next to When accessing [domain URL], click the box and select your preferred option:
- Redirect to https://domain.com
- Block access to the http:// site
- Display the site normally
- Click the Update button
Updating Links
If you have any absolute links in your site’s code, they should be updated from HTTP to HTTPS. For more information about absolute links, check out our explanation of Relative and Absolute links.
WordPress
After you have added an SSL certificate, it will automatically be installed on your domain. There are two steps to take after this automatic installation has taken place:
- Change the display option for the HTTP version of your site
- Update WordPress Database Links
- Update WordPress Address URL
Changing the Non-SSL Display Options for WordPress Hosting
WP Enthusiast WP Professional WP Professional Plus
If you have a WP Enthusiast, WP Professional, or WP Professional Plus hosting account, you follow these steps to make changes to how visitors are treated on the non-secure HTTP version of your site.
- Log in to the ACC
- Click WordPress in the left sidebar
- Click Manage Domains in the drop-down
- Click on the URL of your domain in the Domain column
- Scroll down to the Non-SSL Site Display Option section
- Next to When accessing http://domain.com: click the box and select the display option you prefer
- Click Update directly underneath the display options box
The non-secure HTTP version of your site will now treat visitors based on the option you chose. You can come back and change this at any time.
Updating Your WordPress Database Links
We also recommend updating all links in your database to HTTPS. This can be accomplished by using a plugin, like Velvet Blues, or via the wp-cli command line tool.
It is important that you do not modify any HTTPS links in the guid column. The Velvet Blues plugin automatically marks the guid column as unalterable.
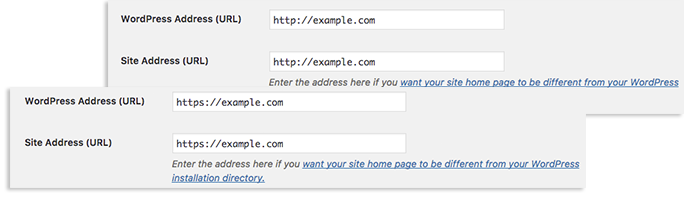
Updating WordPress Address URL
If you use WordPress via a PairSIM installation or have internal links on your WordPress site using HTTP instead of HTTPS, you should update the site address within the WordPress editor.
To do this, you need to change the WordPress Address URL and Site Address URL from HTTP to HTTPS. You can do this easily by following these steps:
- Log into your WordPress account
- At the bottom of the left sidebar, click Settings
- Click General

- In the boxes next to WordPress Address (URL) and Site Address (URL), add a ‘s’ to ‘http’
After you have taken these steps, your site will begin to use SSL, thus making the connection between your site and its visitors more secure.