Podcast Websites
Podcast Website accounts come with exclusive website designs, called "themes." These themes were designed for podcasts, complete with features designed to highlight your episodes and podcast information.
They're fully customizable, too! So you can change the look and feel of your website to match your podcast's brand.
Identify Your Chosen Theme
If you have chosen one of our exclusive podcast themes, we can show you the exact steps to customize your theme.
But first you need to know which theme you're using. You can check by:
- Logging in to the WordPress Admin Interface
- In the left sidebar, click Appearance
This will take you to the theme's page. The theme you're currently using will be displayed in the top left corner. The name of the theme is located at the bottom of the theme box.
Once you know the name of your theme, read its tutorial below for theme-specific instructions.
Access the Customizer
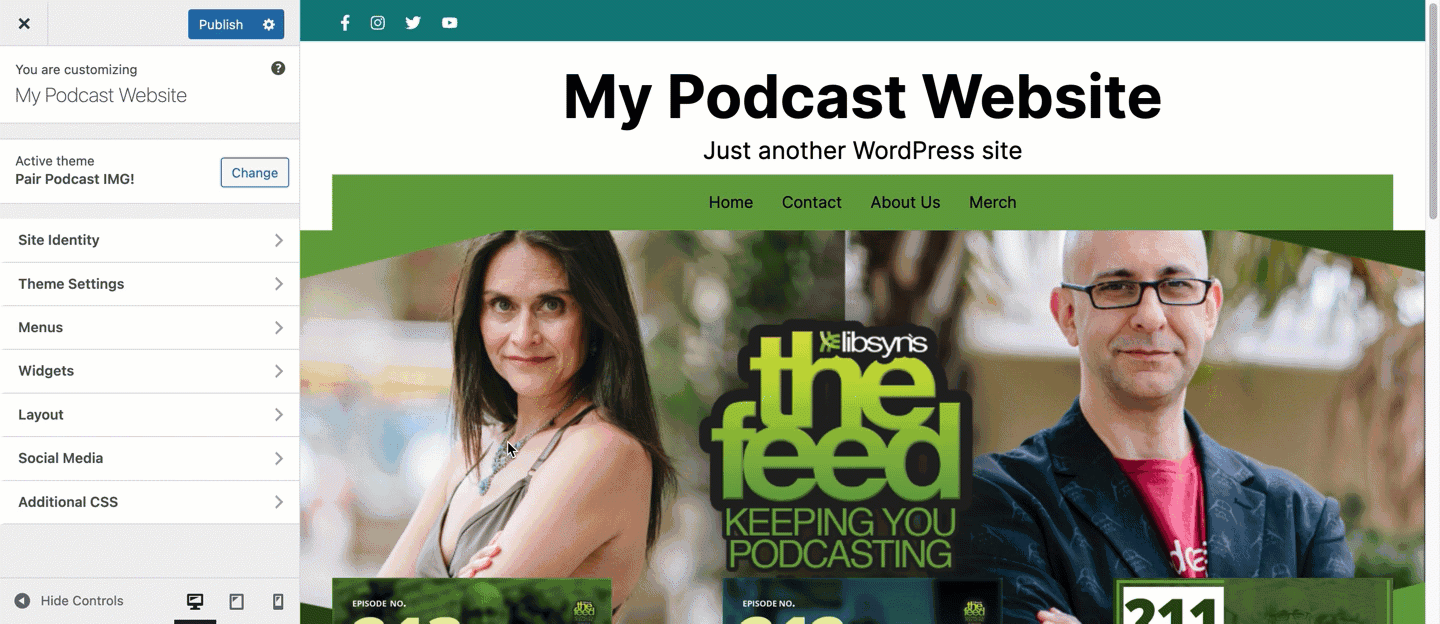
If you're using the Pair Podcast IMG! theme, follow these steps to access the website customizer:
- In the left sidebar, hover over Appearance
- In the drop-down, click Customize
This will bring you to the Customizer interface. You can make custom changes to your website theme here.
Customizer Options
There are a few options when you enter the Customizer interface. We'll walk you through the interface below so you can use it effectively.
Header & Footer Customization:
Image and Icon Customizations:
Individual Podcast Page/Post Customizations:
Homepage Customizations:
Navigation Bar Settings
Advanced Customizations:
See a specific action you'd like a tutorial for? Click on it to be taken to its instructions.
Site Identity
Click on the Site Identity tab in order to access any of the following customizations:
- Site Title
- Tagline
- Site Icon
Site Title
The Site Title is the large text that appears at the top of your site.
To make changes, edit the text in the Site Title textbox.

Tagline
The Tagline is the line of text beneath the Site Title. You can edit the tagline by changing the text in the Tagline textbox. If you wish to remove the tagline all together, simply delete all the text in the Tagline textbox.
Site Icon
The Site Icon is an icon that is shown in browser tabs, bookmarks, and more. If you'd like to customize your site's icon, you can upload one in the Site Icon section.
To upload an image, go to the Site Icon section and click the Select Site Icon box.
Theme Settings
Theme Settings allows you to edit:
- Site Colors
Site Colors
Change your site colors to match your podcast brand. Make the changes easily by going to Theme Settings > Site Colors.
You can select from a variety of preset color options, or manually select your colors. To select a preset color, choose any option under the Color Swatch section.
To manually select your colors, click Select Color next to the color you'd like to change, then use the color picker to select a color.
Menus
The Menu section allows you to:
- Create and manage a navigation bar
Add noteworthy pages and links to your navigation bar. Visitors will use your navigation bar as a way to explore your site. Navigation bars on podcast websites often include pages like:
- About the Host
- Sponsors
- Merch
- Contact
Have you created pages on your website? If not, check out our page creation guide: Create Website Pages on Podcast Websites
You can customize your navigation bar by using the Menus section. Once in the Menus section, you can follow the steps below to build your own navigation bar.
To create a navigation bar:
- Under the Menus header, click Main
- Click + Add Items
- Click on the type of item you'd like to add. For example, if you want to add one of your pages, click on Pages.
- Click the + button next to the items you would like to add. If you are adding something that requires input (like Custom Links), fill in the information, then click Add to Menu
- If you want to remove an item, click the red x next to the item
Don't see a red x? Click the Add Items button again to make sure it's selected.
Adding your navigation bar to your website:
Once a navigation bar is created, you need to add it to your site. To do so:
- Return to the Menus section. You'll know you're here if the title text says, "You are customizing Menus"
- Under Menu Locations, click View Location
- Under Main Menu, select Main from the drop-down

This will add your navigation bar to your website.
Widgets
Use the Widgets section to:
- Add content and information to your sidebar and footer areas
Not familiar with widgets? They are compact website features you can add to your website's sidebar or footer. Some common widgets include:
- Audio player
- Calendar
- Website categories
- Images
When you first enter the Widgets tab, you may see a message saying:
Your theme has 2 widget areas, but this particular page doesn’t display them.

You can navigate to other pages on your site while using the Customizer to view and edit the widgets displayed on those pages.
This message only displays when the live site preview is on a page that doesn't contain any widget areas. The IMG! theme only has widget areas on Pages and Posts. To add a widget, you need to first navigate the live preview to a page or post area. The live preview can be used like a regular website, so you can click on any post or page to navigate to it.
Once on a page or post, you will see a Sidebar tab in the customizer sidebar. Click this tab. Then click the + Add Items button. This will open up a list of widgets you can add. Click on the widgets you would like to add. Keep in mind that some widgets may require more information when they are added.
Layout
Change the look of your site by using the options in the Layout.
The Layout option allows you to:
- Add a site logo to your header
- Set a large header image on your home page
- Add a title above your podcast posts
- Add a tagline beneath the title
- Hide sidebar on pages/posts
- Hide title on podcast squares
- Show author on posts
- Hide the "Hosted by Pair Networks" text
Logo
Add a logo to your website's header. Add or manage your logo by going to Layout, then using the interface under Logo.

The first time you access this section you should see a box that says Select Image. Click this box to upload your logo. Once you have uploaded an image, the image will appear in the place of the box. Below the image, there will now be a Remove and Change Image button you can use to make further changes.
Blog Page Hero Image
The Blog Page Hero Image is a large image on your homepage, directly beneath your homepage title and navigation bar.
To add an image to this location, click on the Select Image block. Use the following interface to upload your desired image. Keep in mind that the theme may crop your image to fit into the website.

Once an image has been added, two additional options will appear beneath it: Remove and Change Image. You can use these to swap out your image or remove it all together.
Blog Page Title
Underneath the Blog Hero Image option, you will see the Blog Page Title and its corresponding textbox.
The Blog Page Title appears on your homepage above your podcast posts, but below the header. If you opted for a Blog Page Hero Image, then this title will appear on top of the image.

Blog Page Subtitle
Want to add a tagline to your Blog Page Title? You can do so by adding text to the Blog Page Subtitle textbox.
It will appear directly below the Blog Page Title.

Show sidebar on posts or pages?
If you want your website to have a sidebar, make sure the Show sidebar on posts and pages? option is set to Yes. If you do not want a sidebar, then set this option to No.
Keep in mind that the sidebar primarily shows Widgets, so unless you have a widget set, the sidebar area may not be visible.
Show title text on homepage squares?
Do you want your podcast post squares to have a title overlay? If so, make sure that the Show title text on homepage squares is set to Yes. To hide the title overlay on podcast post squares, select No.
Show the author on posts?
Your individual podcast posts (the web pages you go to when you click on one of your podcast squares) won't show the author by default. If you want to show the author, select the Yes option next to Show author on posts.
Keep in mind that the "author" that is displayed will be the name and image associated with the user account. You can manage your users by returning to the WordPress admin interface and clicking User in the left sidebar.
Hide "Hosted by Pair"
Your footer displays "Hosted by Pair Networks" by default. If you want to remove this text, select Yes under the Hide "Hosted by Pair" option.
Social Media
The Social Media tab allows you to integrate social media links into your website. All you need to do is open the Social Media tab, then add your social media links into their corresponding text boxes. Once you add a link to the textbox, a social media icon will appear on your live site preview.

Additional CSS
The additional CSS tab gives you a space to enter CSS into your site manually.
Not familiar with CSS? It's short for Cascading Style Sheets. You can find out more about CSS at this resource: W3 School's CSS Tutorial